
Introduction
What Is AR for Ecommerce?
In 2025, the key to successful **web AR implementation** is accessibility. The trend has moved away from requiring customers to download a dedicated app. Modern solutions, like those highlighted by Shopify, are built to run directly in the mobile browser (WebAR), creating a seamless and frictionless user experience. This technology is no longer a futuristic luxury; it’s a practical tool for any online store.
Why You Can’t Afford to Wait
Integrating AR is a direct investment in your customer experience and your bottom line.
Crush Buyer Hesitation
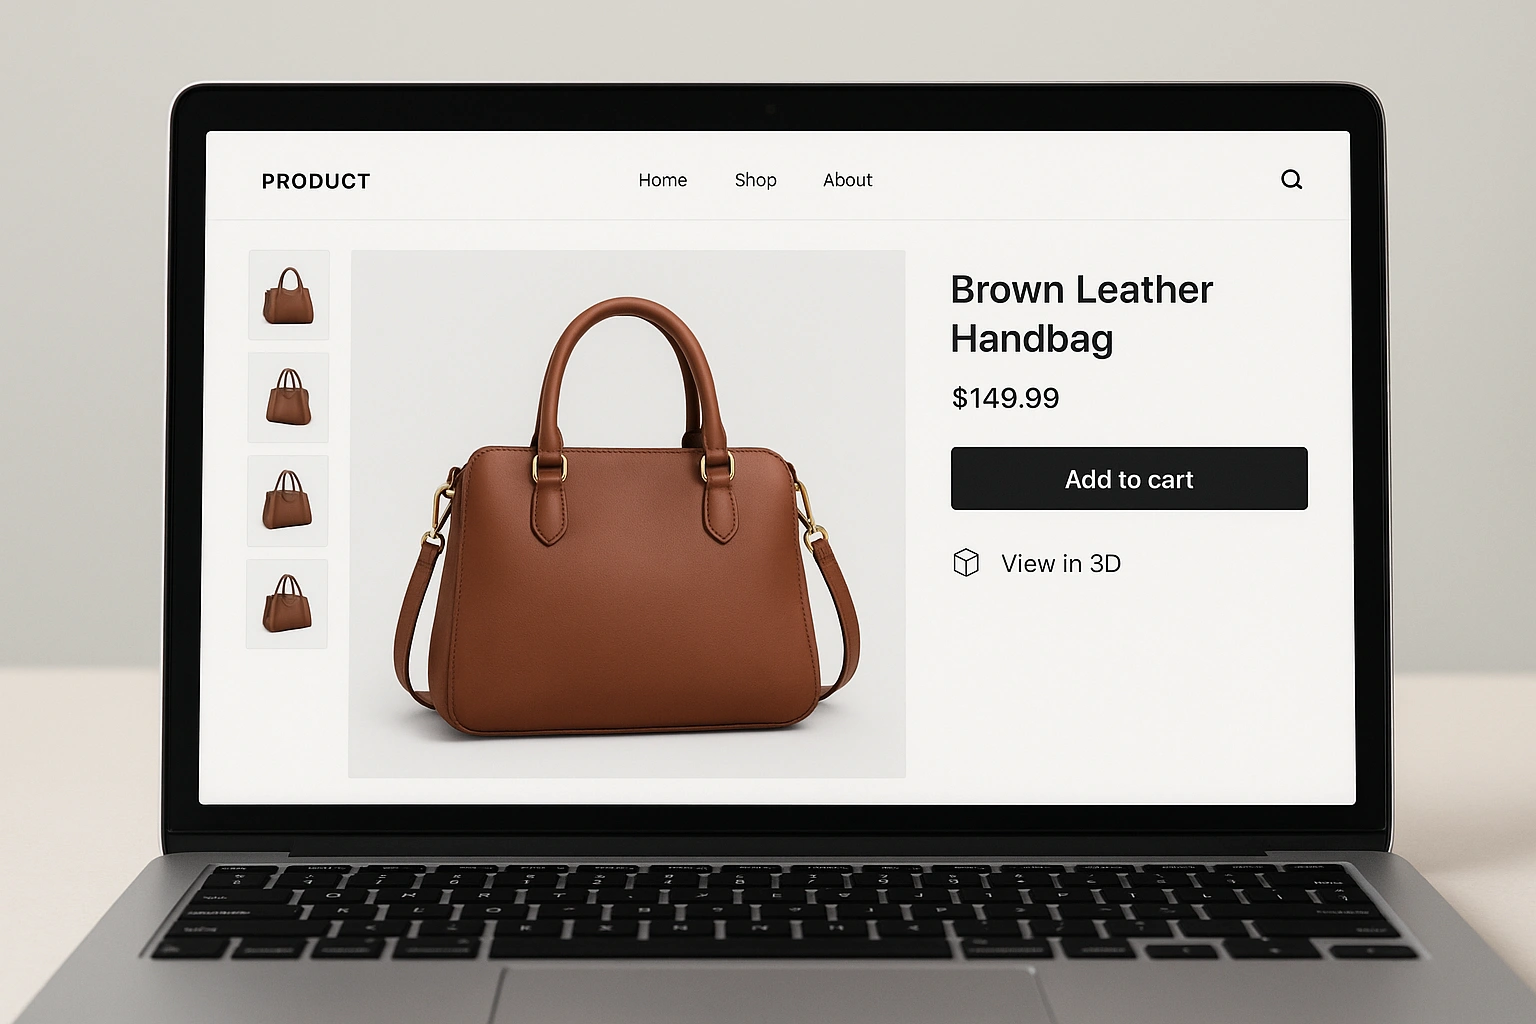
AR answers the biggest questions customers have: “How big is it really?” and “Will it look good in my space?” By letting them see the product in context, you remove doubt and increase their confidence to purchase.
- Example: A customer instantly confirms that a 65-inch TV will fit on their media console.
- Benefit: Higher conversion rates and a shorter sales cycle.
Drastically Reduce Product Returns
A significant portion of returns comes from products not meeting size or style expectations. AR sets accurate expectations from the start.
- Example: A shopper realizes a red armchair clashes with their blue walls *before* they order it.
- Benefit: Lower return rates mean saving money on reverse logistics and restocking fees.
Increase Engagement and Time on Page
An interactive 3D product viewer is far more engaging than static images. Customers spend more time interacting with your products, which strengthens their connection to your brand.
- Example: A user spends two minutes rotating and examining a 3D model of a sneaker, an experience similar to the most engaging AR marketing campaigns.
- Benefit: Increased time on page is a positive signal to search engines and can improve your SEO rankings.
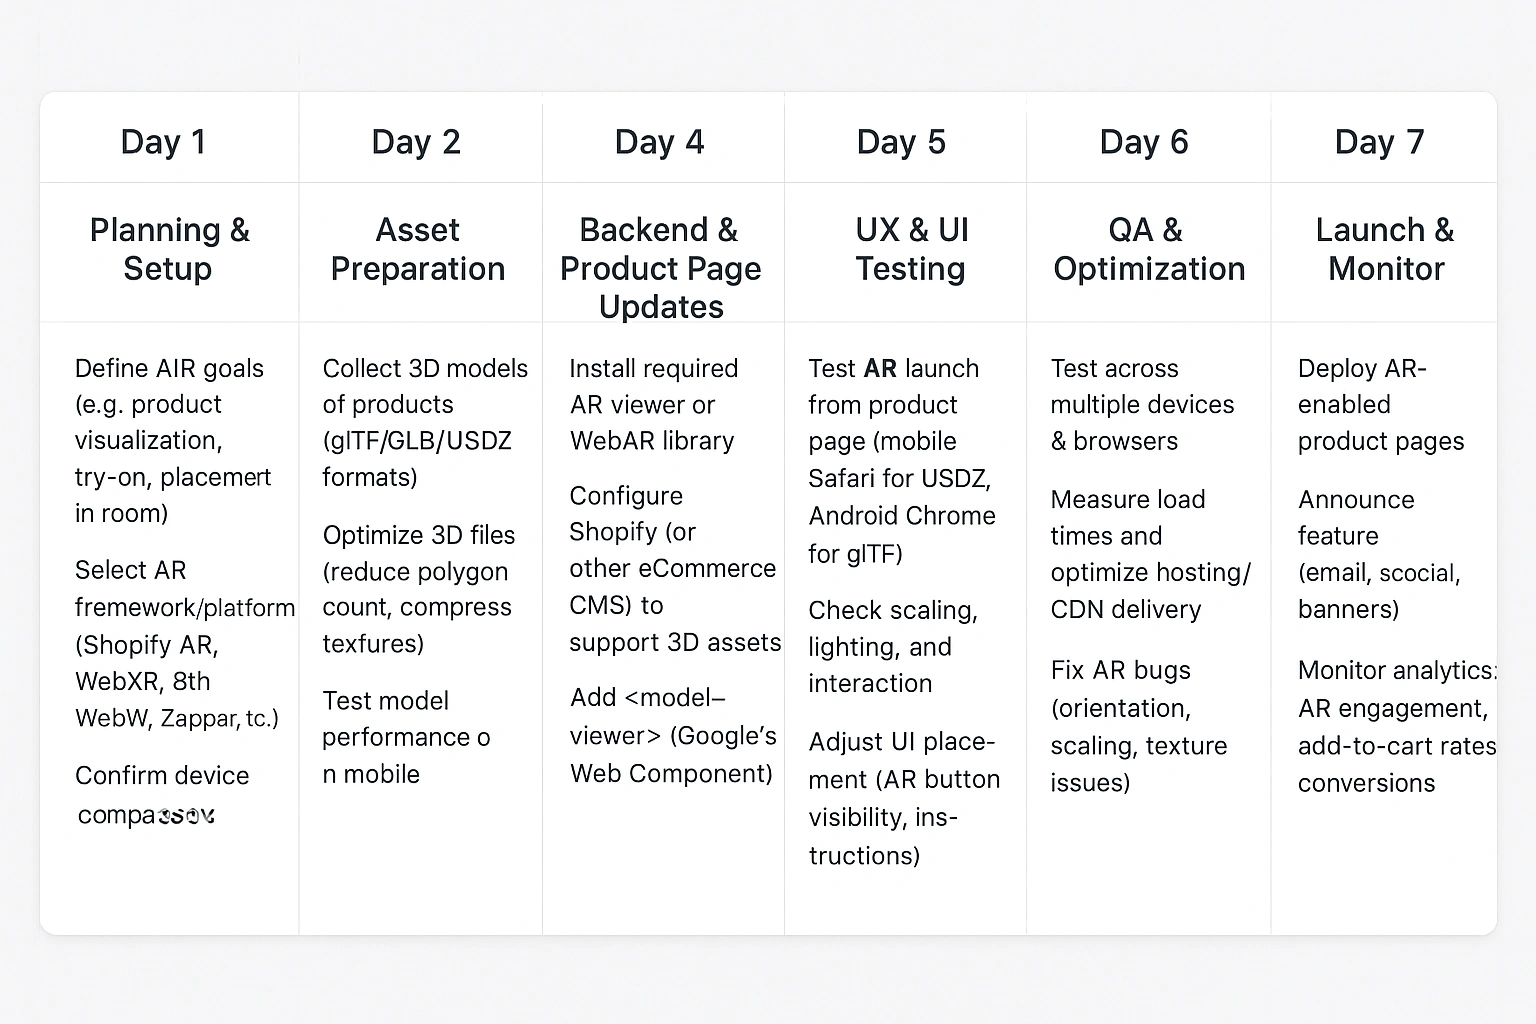
The 7-Day Plan for Web AR Implementation
Here is a realistic, step-by-step timeline to get your first AR experience live in one week.
- Day 1: Strategy & Product Selection. Choose 1-3 of your bestselling products where size and scale are important. Define your goal (e.g., “reduce returns for this product by 20%”).
- Day 2: Create Your 3D Models. This is the most crucial step. You have three main options:
- DIY (Photogrammetry): Use an app like Polycam to create a 3D scan with your phone. Best for simpler objects.
- Hire a Freelancer: Find a 3D artist on a platform like Upwork or Sketchfab. Cost-effective for a few models.
- Use a Service: Companies like Avataar or VNTANA specialize in creating high-quality 3D models at scale.
- Day 3: Choose Your AR Platform. You don’t need to build from scratch. Select a platform that fits your store. Many e-commerce platforms like Shopify have native support.
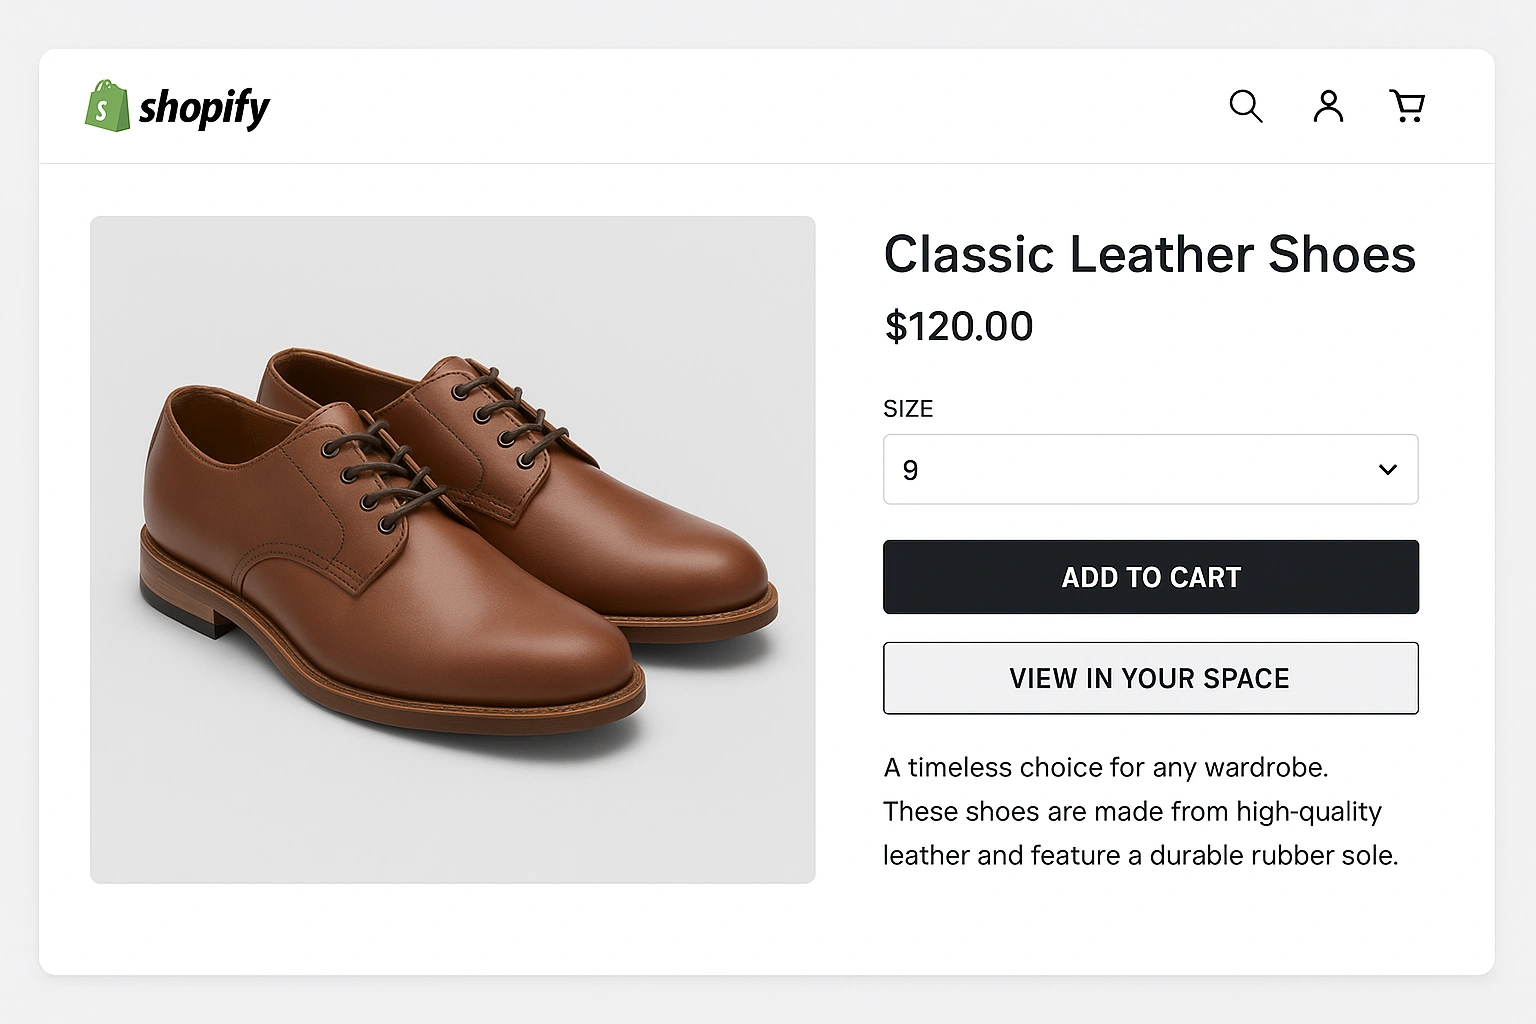
- Day 4: Integration. This is the technical part. For a platform like Shopify, it’s as simple as uploading your 3D model file (usually a .glb or .usdz file) to the product media section.
- Day 5: Testing. Rigorously test the experience on different devices (iPhone and Android) and browsers (Chrome, Safari). Ensure the “View in Your Space” button is prominent on your **AR product pages**.
- Day 6: Launch & Promotion. Make your AR-enabled product page live! Announce the new feature to your email list and on social media to drive traffic.
- Day 7: Analyze & Iterate. Review your analytics. Is there an increase in add-to-carts or a decrease in returns for the AR-enabled product? Use this data to justify expanding the program.
Real-Life Example: Shopify’s Native AR
Shopify has been a leader in democratizing **AR for ecommerce**. Their platform allows merchants to upload 3D models directly to their product pages. If a user is browsing on an AR-compatible device, a special badge appears, and they can instantly launch the “View in Your Space” experience.
The beauty of this approach is its simplicity. There are no complex integrations or third-party apps required for the basic functionality. For a small business owner, this means they can hire a freelancer to create a 3D model on Day 2 and potentially have it live on their store by Day 4. It’s a powerful and accessible entry point into the world of immersive commerce.
Pros & Cons of Shopify’s Approach
| Pros | Cons |
|---|---|
| ✅ Seamlessly integrated into the platform | ❌ Limited to Shopify stores |
| ✅ No extra cost for the feature itself | ❌ Lacks advanced features like virtual try-on for apparel |
| ✅ Extremely easy for merchants to implement | ❌ You are still responsible for sourcing the 3D models |
Comparison of AR Implementation Platforms
Here are a few options for bringing a 3D product viewer and AR to your site.
| Platform | Key Features | Pros | Cons | Best For |
|---|---|---|---|---|
| Shopify Native AR | Built-in 3D model support, WebAR | Easy, no extra cost | Basic functionality | Shopify merchants selling hard goods like furniture or electronics. |
| An open-source web component for 3D/AR | Free, highly customizable, works on any website | Requires some web development knowledge | Brands with a developer who want a custom solution on any platform. | |
| Third-Party Platforms | Services like 8th Wall or Zappar | Advanced features, analytics, support | Subscription cost | Larger brands wanting advanced features like virtual try-on or complex animations. |
Common Mistakes to Avoid
Avoid these common pitfalls when launching your AR experience:
- Low-Quality 3D Models: A plasticky, unrealistic model will hurt your brand more than it helps.
- Incorrect Scaling: The #1 rule is that the AR model must be true to scale.
- Large File Sizes: Unoptimized 3D models will lead to slow loading times and abandoned sessions.
- Hiding the AR Button: Make the call-to-action clear, visible, and above the fold.
Expert Tips & Best Practices
Follow these tips for a successful launch:
- Optimize Your Models: Aim for file sizes under 10MB for fast loading on mobile networks.
- Use Both .GLB and .USDZ: Provide both file formats for the best compatibility across Android and iOS devices.
- Add a “How to Use” Guide: A simple animation or tooltip can help first-time users.
“The biggest barrier to web AR implementation used to be complexity. Now, it’s mindset. Stop thinking of it as a massive project. Think of it as an enhanced product photo. Create one great 3D model, upload it, and test. The data will speak for itself.”
Frequently Asked Questions (FAQ)
Q: How much does a professional 3D model cost?
A: Costs can range from $50 for a simple object from a freelancer to several hundred dollars for a complex, highly detailed product from a professional agency.
Q: What products are best for AR?
A: Products where size, scale, and aesthetic fit are crucial. This includes furniture, home decor, electronics, and accessories. Virtual try-on for eyewear and watches is also very effective.
Q: Do I need a developer for web AR implementation?
A: Not necessarily. If you’re on a platform like Shopify, you can do it yourself. For a custom website or more advanced features, you will likely need a developer’s help.
Conclusion
Adding **AR for ecommerce** is no longer a six-month, six-figure project. With modern platforms and a clear strategy, you can launch a powerful, conversion-boosting experience in just one week. By starting small with a high-quality **3D product viewer** for a key product, you can test the waters, gather data, and build a compelling case for expanding your immersive strategy. The tools are here, and they’re more accessible than ever. To keep up with the future of retail, follow publications like WIRED.